Container Manager
Introduction to the Container Manager
The Container Manager includes a rich set of features that allow users to easily manage Environments and Containers. Each Environment consists of Containers and folders. Folders allow you to organize your containers as you see fit. When deploying code and queries against a Container, the Container name is identified by the name of its parent folder in the Container Manager together with the Container name, for example “Folder1\Container1”. In order to transfer packages between Dev, QA, and Production, the folder names and Container names in each Environment must be identical. For more details please refer to the section titled Executing Code Packages.
The Container Manager can be viewed by selecting View > Container Manager from the Combine menu.
Key features of the Container Manager are listed below in the context of Environments, folders, Containers, and target databases in Static Containers.
Environments:
Folders:
Containers:
Target database in Static Containers:
Creating Environments
Environments contain Containers that can be placed directly under the Environment or under folders and sub-folders. Folders are provided to help users organize their Containers. Each Environment has a name, description, and authentication type. For more details regarding these parameters please refer to the Environment Wizard section. Environments can be created by either using the Environment Wizard or by copying an existing Environment and pasting it under the root node in the Container Manager. To add an Environment using the wizard, follow one of the options below:
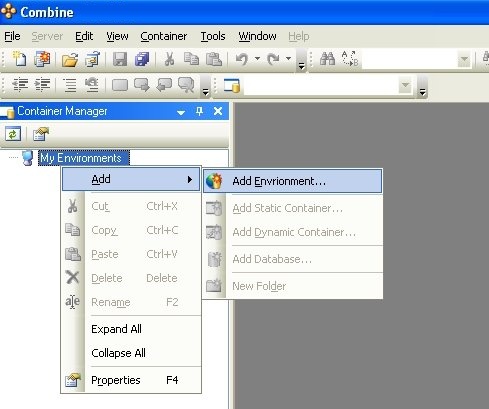
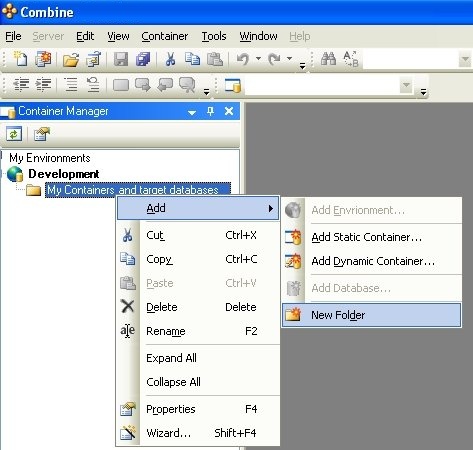
Right-click the root node in the Container Manager, choose Add, and then Add Environment.
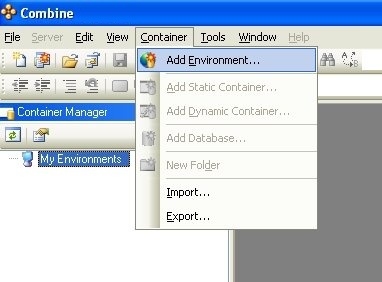
Left-click the root node in the Container Manager. In the main menu go to Container and press Add Environment.
Environment Wizard
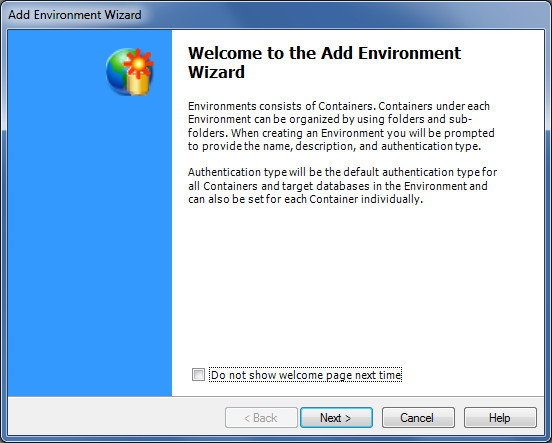
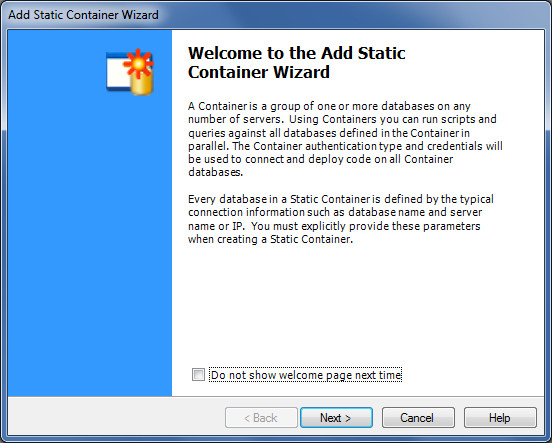
The welcome page is the first page in the wizard. If you do not wish to see this page again, mark the “Do not show welcome page next time” checkbox and press next.
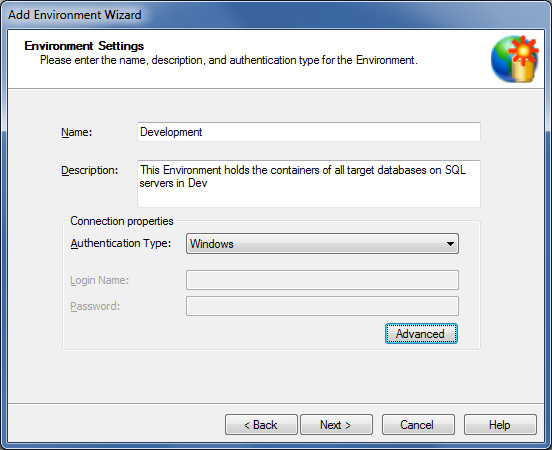
Next you will be asked to enter the name, description, and authentication type for the Environment. The Environment name will be displayed in the Container Manager. The description is optional and can be used to associate comments with the Environment. The authentication type will be the default authentication type for the Containers, folders, and target databases in the Environment. You can later specify the authentication type and credentials for each Container and folder, which will override the Environment settings. The authentication type for each Container will later be used to connect and deploy code on all the databases in the Container.
The authentication type can be set to one of SQL Authentication, Windows Authentication, or Prompt which is also the default. Also you are able to modify all SQL server connection options using Advanced button.
Note that when either Windows authentication or Prompt is selected, Combine will not store your user name and password anywhere.
Finally, after you press the Next button you will reach the last page in the wizard, which will ask you to press Finish to complete the Environment creation.
Editing Environments Using the Wizard
If you wish to change the settings for your environment, such as the Environment name, authentication type, or configuration, you can do so by right-clicking the Environment and selecting the Wizard option. The pages in the Edit Environment Wizard are identical to the ones described in the Add Environment Wizard. Please refer to the section Environment Wizard for more information regarding the wizard.
Editing Environments Using the Properties Window
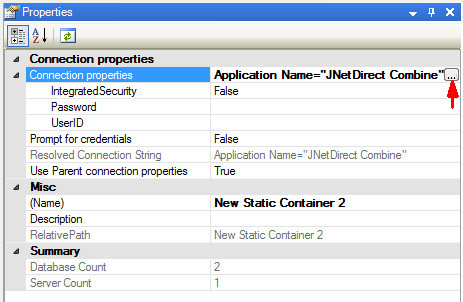
The Environment name, description, and authentication type can be manually altered through the Properties window. To view the Properties window you can either press F4, or right-click the Environment icon and choose Properties in the menu, or press the Properties icon  . You can then view and modify the Properties shown below.
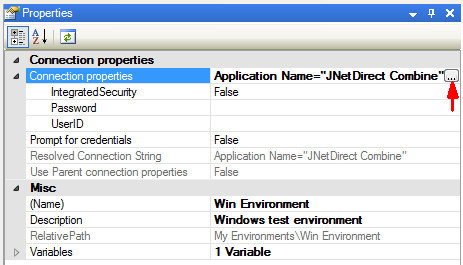
User is able to modify either credentials to log into the server or even the entire connection string. The credentials settings can be expanded from the Connection properties section:
-
Integrated Security – When Integrated Security is turned ON, SQL Server leverages Windows NT authentication to validate SQL Server logon accounts.
-
UserID – SQL logon name for SQL Authentication.
-
Password – Password for SQL Authentication.
If “Integrated Security” is set to “False” but credentials aren’t provided, you will be prompted to enter the authentication type and credentials to connect to databases and servers defined in your Containers at run-time, before code is deployed against all Container databases.
You also enforce Combine to ask for credentials for an Environment by setting “Prompt for credentials” flag to “True”.
The effective connection string which will be used during run-time is displayed in “Resolved Connection String”.
A button at the end of Connection properties string (marked with red arrow) brings a Connection Propeties dialog which allows to modify all properties available for Microsoft SQL Servers.
Copy-Paste an Environment
You can copy and paste an existing Environment to create a new Environment. Once an Environment is copied it can only be pasted under the root node in the Container Manager tree display. When an Environment is copied, the folders, Containers, target databases and all other configuration settings under the Environment are copied over to the new Environment. Choose one of the following options to copy-paste an Environment:
-
Right-click the Environment you wish to copy and press Copy in the menu. Then left-click the root node in the Container Manager to select it. Right-click again and select Paste in the menu.
-
Use CTRL+C and CTRL+V to copy and paste the Environment.
-
Hold the CTRL button. Using the mouse, drag and drop the Environment under the root node of the Container Manager.
-
Press the Copy icon in the main toolbar, select the root node, and then press the Paste toolbar icon.
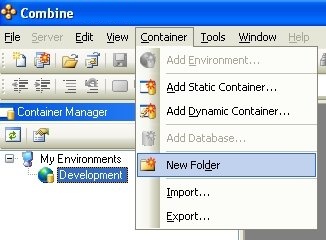
Creating Folders in the Container Manager
Folders are provided as an optional feature to help you organize the Containers in the Environment in any way that you see fit. Folders can be created through the Folder Wizard or by copy-pasting an existing folder. When creating a folder you will be asked for the folder name, description, and authentication type. The authentication type will be the default authentication type for Containers and their target databases that are placed under the folder, as well as any subfolders. The Container authentication type and credentials are used to connect and deploy code on all the Container databases. You can later set the authentication type for each Container and subfolder and these settings will override the authentication type of the parent folder. To start the wizard, use one of the options below:
In the Container Manager, right-click the Environment (or folder) under which the new folder (or subfolder) will be placed and choose Add, and then New Folder.
Left-click the Environment (or folder) under which the new folder (or subfolder) will be placed. Go to the main menu and then select Container and New Folder.
Folder Wizard
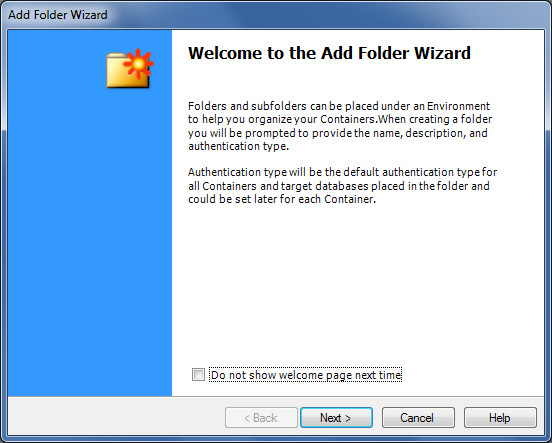
The first page in the wizard is the Welcome page. If you do not wish to view the welcome page from now on then check the “Do not show welcome page next time” checkbox and press next.
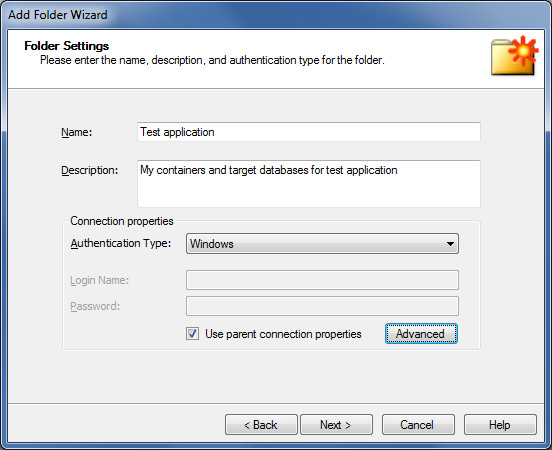
In the next page of the wizard you will be asked to enter the name, description, and authentication type for the folder. The name will be displayed next to the folder under its parent Environment or parent folder. The description is optional and lets you enter comments for the folder. The authentication type will be the default authentication type for the Containers placed under the folder and their target databases. You can later specify the authentication type and credentials for each Container that will override the folder settings.
The authentication type can be set to one of SQL Authentication, Windows Authentication, or Prompt which is also the default. When Use parent connection properties checkbox is checked all connection properties are inherited from a parent node. The parent node can be either an upper folder or an Environment. Also you are able to modify all SQL server connection options using Advanced button.
Note that when either Windows authentication or Prompt is selected, Combine will not store your user name and password anywhere.
When you are done entering the needed information press Next. In the last wizard page, press Finish to create the folder.
Editing Folders Using the Wizard
You can edit the folder Properties by invoking the Folder Wizard. To start the wizard, right-click the folder you wish to edit and either select the Wizard option or press SHIFT+F4.
Editing Folders Using the Properties Window
The folder name, description, and authentication type for a folder, which is used as the default authentication type for the underlying Containers, can be updated directly from the Properties Window. To start the Properties window you can select the folder of interest and hit the F4 key. You can also right-click the folder icon and select Properties, or press the Properties icon on the main toolbar .
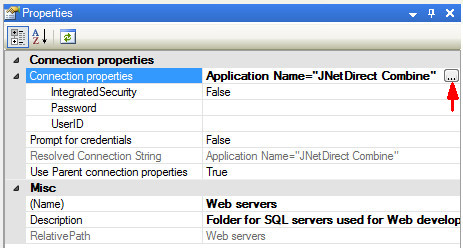
User is able to modify either credentials to log into the server or even the entire connection string. The credentials settings can be expanded from the Connection properties section:
-
Integrated Security – When Integrated Security is turned ON, SQL Server leverages Windows NT authentication to validate SQL Server logon accounts.
-
UserID – SQL logon name for SQL Authentication.
-
Password – Password for SQL Authentication.
If “Integrated Security” is set to “False” but credentials aren’t provided, you will be prompted to enter the authentication type and credentials to connect to databases and servers defined in your Containers at run-time, before code is deployed against all Container databases.
You also enforce Combine to ask for credentials for a Folder by setting “Prompt for credentials” flag to “True”.
Please note that when the “Use parent connection settings” option is checked then all connection settings are inherited. Exceptions are “Data Source” and “Initial Catalog” for SQL Databases inside Containers which always override any values from the parent container.
The effective connection string which will be used during run-time is displayed in “Resolved Connection String”.
A button at the end of Connection properties string (marked with red arrow) brings a Connection Propeties dialog which allows to modify all properties available for Microsoft SQL Servers.
Copy-Paste a Folder
Folders can be copied and pasted either in the same Environment or from one Environment to another. Folders can be pasted directly under the Environment node of the Container Manager tree or under other folders. When copying folders, all subfolders and Containers under the copied folder will be copied as well. To copy and paste folders you may follow one of these options:
-
Right-click the folder you wish to copy and press Copy in the menu. Left-click the Environment or folder in which the new pasted folder will be placed. Right-click again and select the Paste option in the menu.
-
Use CTRL+C and CTRL+V to copy and paste the folder.
-
Hold the CTRL button. Using the mouse, select and drag one or more folders and drop them under a desired Environment or folder.
-
Press the Copy icon on the main toolbar, select the Environment or folder where the new folder will be pasted, and then press the Paste icon on the toolbar.
Moving Folders
Folders can be moved within the same Environment or to other Environments. When folders are moved, all their underlying subfolders and Containers will be moved as well. Several options can be used to move folders:
-
Drag and drop – Using the mouse, drag and drop a folder from one location to another.
-
Cut and paste – Cut the folder from its current location using either CTRL+X or the toolbar icon and then paste the folder to its target location using either CTRL+V or the paste icon.
Creating Static Containers
In the Container Manager, new Static Containers can be created by using the Static Container Wizard or by copy-pasting an existing Container into an Environment or under a folder. Before creating a Static Container, be sure that all the servers that contain the databases that you wish to assign to the Static Container are registered as Combine Servers in the Object Browser.
In the Static Container Wizard you will be asked to provide the name, description, authentication type and target databases for the Static Container. When deploying scripts and queries against the Container, the authentication type and credentials will be used to connect and deploy code on all the databases in the Container. Please select one of the options below to open the wizard:
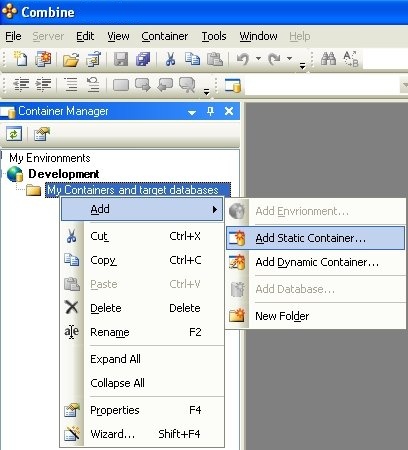
Right-click the Environment (or folder) under which the Container will reside. Then, select Add and choose Add Static Container.
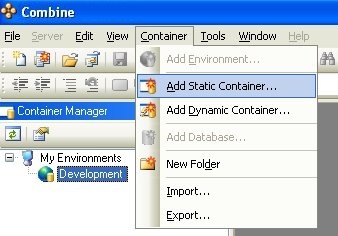
Left-click the Environment (or folder) that will hold the Container and on the main menu go to Container and then Add Static Container.
Static Container Wizard
Before creating a Static Container, make sure that all the servers that contain the databases that you wish to assign to the Static Container are registered as Combine Servers in the Object Browser. When the Static Container wizard is started, the following welcome page will appear. If you do not want to see this welcome page every time you start the wizard then click the checkbox “Do not show welcome page next time” and press Next.
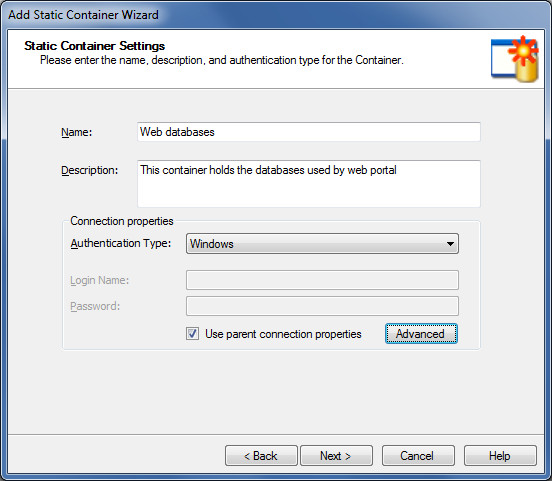
After you press the Next button, you must enter the name of the Container. Two containers in the same Environment should not have the same name in general, to avoid confusion. However, for code deployment purposes, Combine identifies the Container name through the name of the folder under which the Container resides (if any) together with the Container name, so that Containers can have the same name under different folders (this is not recommended).
The Container description is optional and allows you to put comments in the Container for your own reference.
The authentication type can be set to one of SQL Authentication, Windows Authentication, or Prompt which is also the default. When Use parent connection properties checkbox is checked all connection properties are inherited from a parent node. The parent node can be either a folder or an Environment. Also you are able to modify all SQL server connection options using Advanced button.
Note that when either Windows authentication or Prompt is selected, Combine will not store your user name and password anywhere.
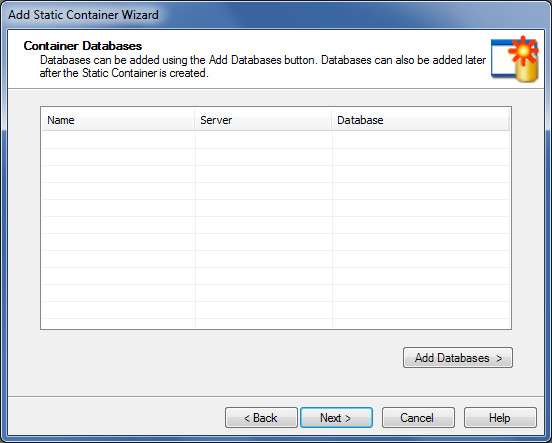
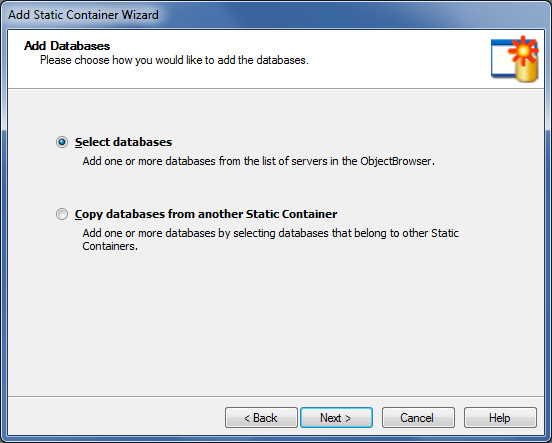
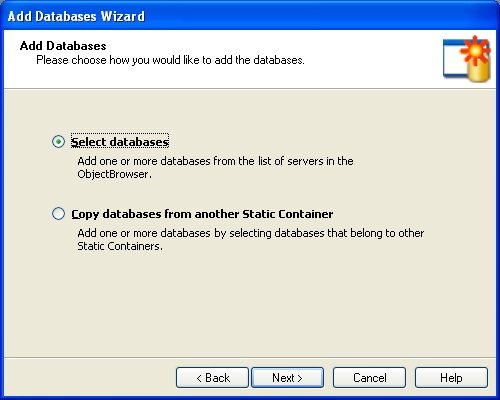
After pressing Next, databases can be added to the Static Container by pressing the Add Databases button. You can also press Next to complete the Container creation and then add target databases to the Container at a later time.
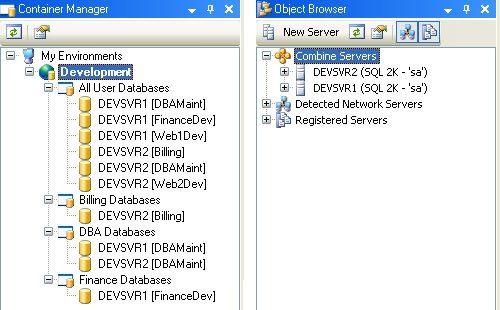
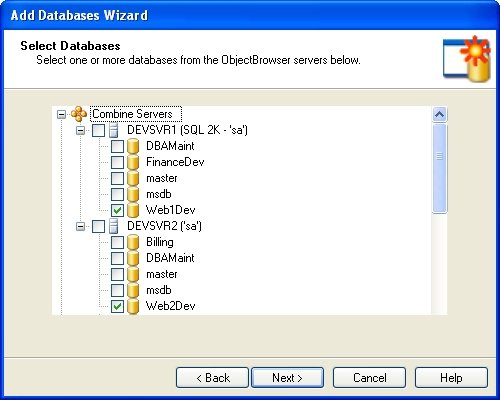
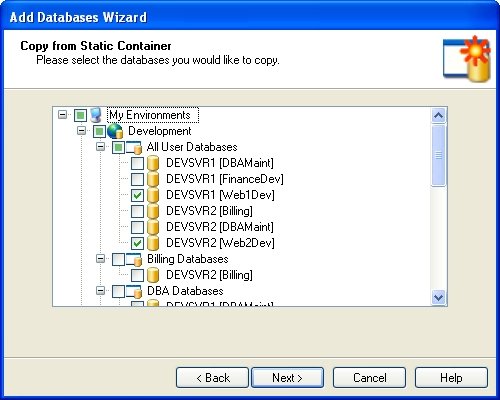
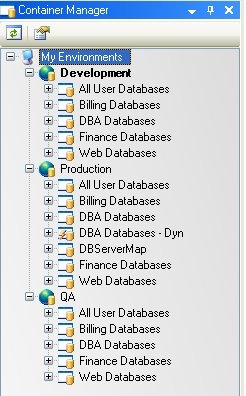
To demonstrate all the features available in the wizard please refer to the example of the Development Environment given in Figure 31, and assume that we wish to create the Web Databases Static Container. Furthermore, assume that all other Containers in the diagram were already created before, and that the DevSvr1 and DevSvr2 SQL servers were previously registered as Combine Servers in the Object Browser (please refer to the section Registering Combine Servers to learn more about server registration). In other words, assume that the Object Browser and the Container Manager already have the Combine Servers and Containers displayed in Figure 32.

There are two convenient ways to add target databases to the Static Container: Adding databases from Combine Servers or Registered Servers of the Object Browser, or copying databases that were already defined in other Static Containers. The second option will be disabled if you have not yet defined any Static Containers. In this example we will add the Web1Dev and Web2Dev databases to the Web Databases Static Container twice, to demonstrate each technique.
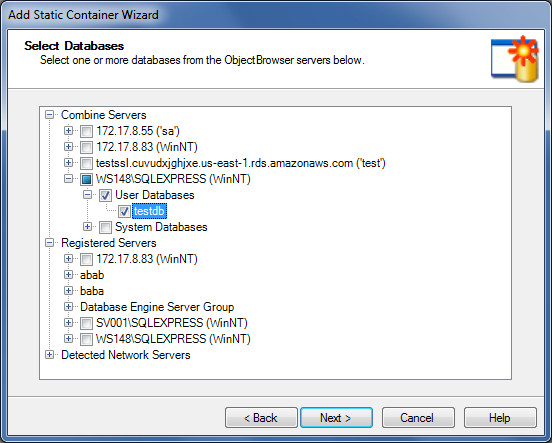
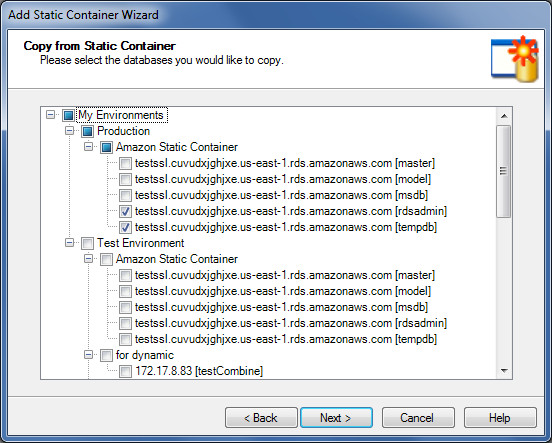
Adding databases from servers in the Object Browser. The first option of selecting the Static Container databases allows you to choose databases from either Combine Servers or Registered Servers in the Object Browser. To use this method, click the Select Databases option as shown in the last figure and press Next. A new wizard window shown in the next figure will appear, and it allows you to choose the Container databases. Here, the two Web databases are selected on the DevSvr1 and DevSvr2 servers.
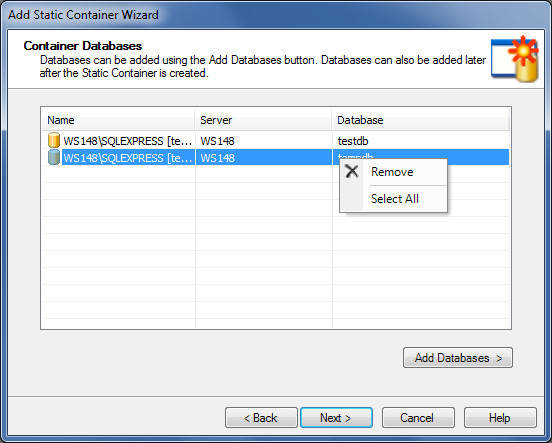
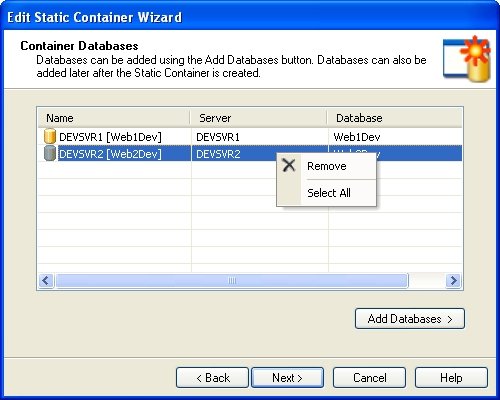
A single database can only be defined in the Container once. If you are adding databases that already exist in the Container then you will be prompted with a warning message. After selecting the databases press the Next button. The next wizard window will then display the Container databases. If you wish to remove databases from the Container you may do so as shown in the figure below, by right-clicking the grid and choosing the Remove option.
When done adding databases, press Next to confirm the changes and create the Static Container.
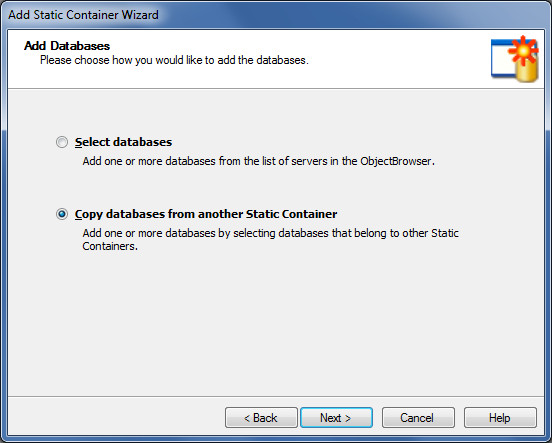
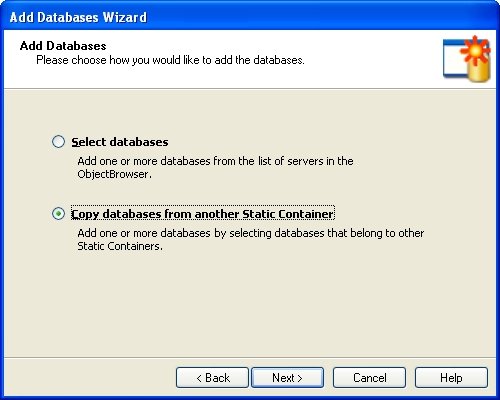
Adding databases from other Static Containers. The second method of adding databases to the Static Container is by selecting databases that already belong to other Static Containers. In this example, the Static Container named All User Databases was previously created and holds all user databases on the two SQL servers. This Static Container will be used to add the two Web databases to the new Static Container. In order to copy databases from other Containers, after pressing the Add Databases button, select the option “Copy databases from another Static Container” in the wizard as displayed in the following figure.
After hitting the Next button, the window presented below will let you select the databases from other Static Containers. In this example, the two Web databases are selected.
When done, press the next button. You will then be presented with the list of databases in the Container. Press the Next button in the window that lists all Container databases and then Finish to complete the Static Container creation wizard.
Note: Additional databases can be added or removed from the Static Container at a later time by either activating the Static Container Wizard again, or by using the right-click menu options in the Container Manager.
Removing Databases from a Static Container
Once a Static Container is created, if you wish to remove databases from the Static Container you can do so in one of two ways: In the Container Manager, right-click the icon of the Static Container and select the Wizard option from the menu. The Static Container Wizard will then start. Press next until you reach the window that lists all the databases in the Container. Select the databases you wish to remove and then right-click and press Remove.
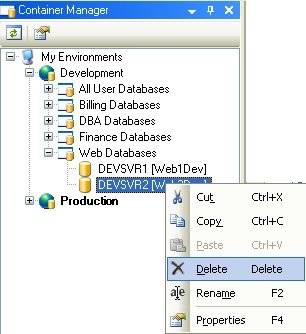
An easier way of removing databases from a Static Container is by right-clicking the databases to remove under the Static Container in the Container Manager, and then pressing the Delete option.
Creating Dynamic Containers
Dynamic Containers consist of a Reference Static Container and a query that will be run against the Reference database in the Static Container. The Static Container that holds the Reference database must be created prior to creating the Dynamic Container. Please refer to the section Static vs. Dynamic Containers for complete details. If a Static Container has not yet been created in the same Environment where the new Dynamic Container will reside, then you will not be able to create the Dynamic Container.
In the Container Manager, Dynamic Containers can be placed directly under an Environment or under a folder by using the Dynamic Container Wizard. The wizard can be started directly from the Container Manager by right-clicking the parent Environment or folder of the Dynamic Container, or from the main menu by pressing Container → Add Dynamic Container.

Dynamic Container Wizard
Make sure that the Static Container that holds the Reference database is created prior to starting the Dynamic Container Wizard. For more information regarding the Reference database and Dynamic Containers please refer to the section titled Static vs. Dynamic Containers.
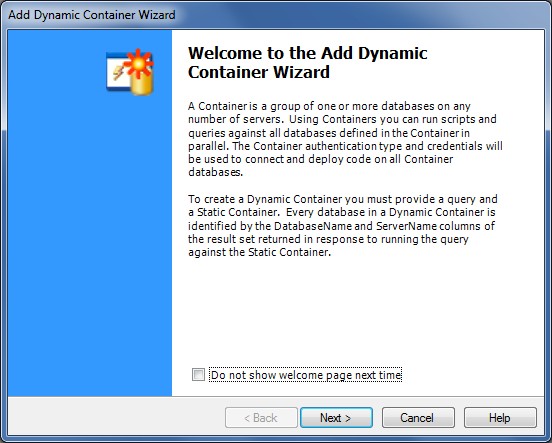
The Dynamic Container Wizard will walk you through the steps required to create a Dynamic Container. In the wizard you will be asked to choose the Reference Static Container, and a query that returns the database and server names from the Reference Static Container. When the wizard is started you will first receive a welcome page. You can choose to not display this welcome page in the future by checking the “Do not show welcome page next time” checkbox. Press Next to move on to the next window.
The next window in the wizard will ask you for the name, description, and authentication type. The name will be used to identify the Container. The description field is optional and lets you associate comments with the Container.
The authentication type can be set to one of SQL Authentication, Windows Authentication, or Prompt which is also the default. When Use parent connection properties checkbox is checked all connection properties are inherited from a parent node. The parent node can be either a folder or an Environment. Also you are able to modify all SQL server connection options using Advanced button.
Note that when either Windows authentication or Prompt is selected, Combine will not store your user name and password anywhere.
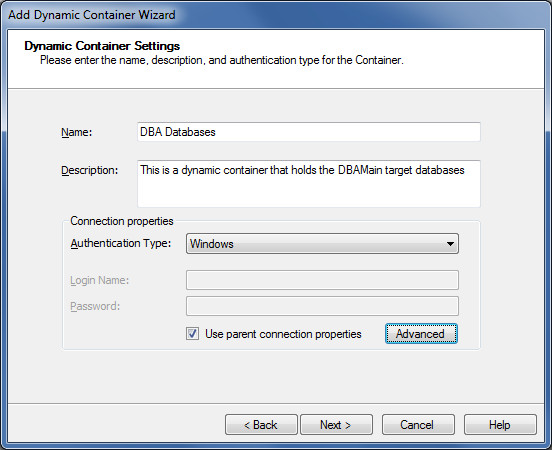
To demonstrate the creation of Dynamic Containers, consider the example of the Production environment in the following diagram. Using the wizard, the Dynamic Container named DBA Databases will be created below.
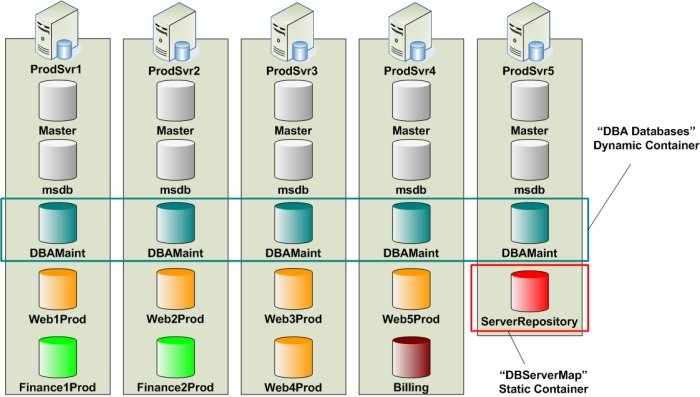
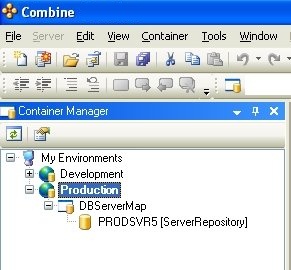
Assume that the Static Container named DBServerMap is already available in the Container Manager under the Production Environment as illustrated in the image below.
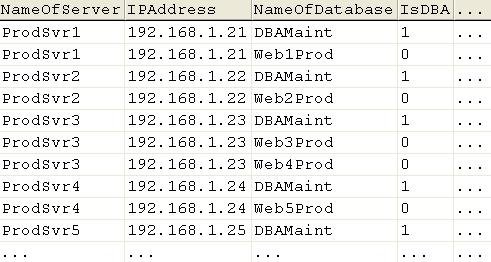
Furthermore, assume that the Reference database ServerRepository contains a table called DBServers with the entries listed in the figure below.
In order to create the Dynamic Container you will need to write a query that returns a single result set where each row entry corresponds to a single target database. The following fields should be returned by the query:
-
ServerName (string, possibly Unicode): The name or IP address of the SQL server that holds the target database. If you are running multiple instances of SQL server on the same physical machine and wish to include a target database on one of the instances, the ServerName returned from the query should be of the format MachineName\InstanceName. For example, ProdSvr21\Instance1.
-
DatabaseName (string, possibly Unicode): The name of the target database.
-
ServerPort (integer, optional, should only be used if server port is not 1433): The ServerPort holds the communication port for the SQL server. This option should only be used by advanced users who are running multiple instances of SQL server on the same machine, or in any other cases whereby the SQL server port is other than 1433 (which is default SQL server port). If the ServerPort column is not returned by the query then Combine will use port 1433 to establish a connection to all target databases.
Notes:
1. Keep in mind that Combine thoroughly examines the values returned by the query and will validate that all settings were entered correctly. If any values are invalid or if Combine cannot successfully establish a connection to all target databases before running the script or any portion of a code package, then code will not be deployed on any target database and the user will be prompted with the list of issues found.
2. If the query returns the same ServerName and DatabaseName twice (regardless of the value for all other fields) only the first entry that has the duplicate ServerName and DatabaseName pair value will be considered. All other entries with the same ServerName and DatabaseName will be ignored.
3. If the query returns more than a single result set then only the first result set will be considered and processed. All other result sets will be ignored.
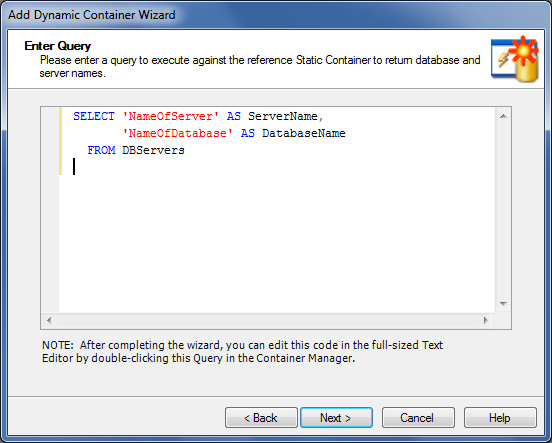
Returning to the example of the Production Environment above, the query that returns the database and server names for all Container databases is:
1 2 3 4 5 6 7 | |
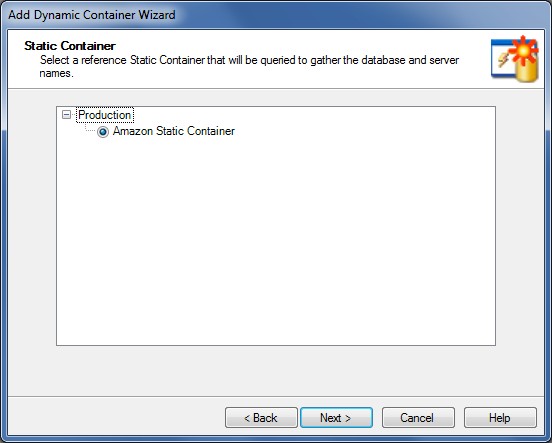
Going back to the wizard, you will now be asked to select the Static Container for the Reference database.
After pressing the Next button, you will be prompted to enter the query for the Dynamic Container. You can also press the Test button to check whether the query results are correctly interpreted by Combine. Press the Next button when you are done. In the last wizard page click Finish to complete the Dynamic Container creation.
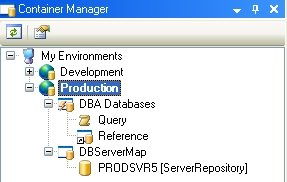
After the DBA Databases Dynamic Container has been created, the Container Manager displays this Container as in the image below. The Reference denotes the Static Container of the Reference database and can be changed through the properties window, or by invoking the Dynamic Container Wizard from the right-click menu of the Dynamic Container.
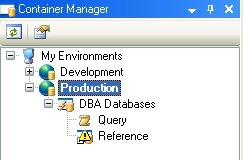
You can also edit the query by right-clicking the query icon and pressing Open. If for some reason the Static Container used to store the Reference database is dropped, the icon of the Reference databases will be changed to alert you of that fact. The new icon is presented in the figure below. In addition, you can search for the Static Container of the Reference database by right-clicking the Dynamic Container Reference icon and pressing the Locate menu option.
Query Used by a Dynamic Container
Dynamic Containers use a Query and a Static Container that holds a Reference data repository to determine the target databases of the Container. When you execute code or deploy packages against a Dynamic Container, the query specified in the Dynamic Container is executed against the target databases of the Reference Static Container. The query returns the server name and database name for each target database for the Dynamic Container, and code and packages will be deployed on all target databases returned in the query results. To learn more about Dynamic Containers, please refer to Static vs. Dynamic Containers, or the Dynamic Container Wizard documentation.
The Query used by a Dynamic Container can contain parameters and variables (see Environment Variables for more information). You can edit the query for an existing Dynamic Container by right-clicking the query icon and selecting the Open option from the menu. The main editor will then open a window with the query code and let you modify and save the changes.
Reference in the Dynamic Container
The Reference is a Static Container used by Dynamic Containers to store the location of a data repository. With Dynamic Containers, the set of target databases on which code and queries are executed is determined in execution time right before the deployment. To determine the target databases, Combine runs the Dynamic Container user-provided query against the Static Container defined in the Reference, to return the database and server names of all target databases. For more information about Dynamic Containers please refer to the section Static vs. Dynamic Containers.
Once a Dynamic Container has been created you can view the properties of the Reference Static Container by selecting the Reference icon and pressing F4. In the Properties window you can also select a different Static Container that will be used as the Reference. You can also choose to use another Static Container as the Reference by right-clicking the Dynamic Container icon and selecting the Wizard option. To learn more about creating Dynamic Containers please refer to the Dynamic Container Wizard.
Editing Containers Using the Wizard
The Container Manager allows you to edit the settings of previously created containers. To edit a Container you can right-click the Container that you wish to edit and select the Wizard option. If you are editing a Static Container, then the Edit Static Container Wizard will show. This wizard contains the same pages described earlier in the section Static Container Wizard. Similarly, if you are editing a Dynamic Container then the Edit Dynamic Container Wizard will be displayed. Please refer to the section titled Dynamic Container Wizard to learn more about how to use this wizard.
Editing Containers Using the Properties Window
In order to change the name, description, or authentication type and credentials for either a Static or Dynamic Container, all you need to do is refer to the Properties window. To view the Properties window you can either press F4, or right-click the desired Container icon and choose Properties in the menu, or click the Properties icon . Once the Properties window appears you can change the settings displayed below.
User is able to modify either credentials to log into the server or even the entire connection string. The credentials settings can be expanded from the Connection properties section:
-
Integrated Security – When Integrated Security is turned ON, SQL Server leverages Windows NT authentication to validate SQL Server logon accounts.
-
UserID – SQL logon name for SQL Authentication.
-
Password – Password for SQL Authentication.
If “Integrated Security” is set to “False” but credentials aren’t provided, you will be prompted to enter the authentication type and credentials to connect to databases and servers defined in your Containers at run-time, before code is deployed against all Container databases. Upon executing scripts and queries against a Container (and thus against all databases defined in the Container), you will be asked to select either SQL Authentication or Windows Authentication. If you use SQL Authentication then you must also provide the login name and password to connect to all databases and servers.
You also enforce Combine to ask for credentials for a Container by setting “Prompt for credentials” flag to “True”.
Please note that when the “Use parent connection settings” option is checked then all connection settings are inherited. Exceptions are “Data Source” and “Initial Catalog” for SQL Databases inside Containers which always override any values from the parent container.
The effective connection string which will be used during run-time is displayed in “Resolved Connection String”.
A button at the end of Connection properties string (marked with red arrow) brings a Connection Propeties dialog which allows to modify all properties available for Microsoft SQL Servers.
Copy-Pasting Containers
You can copy and paste Containers in the same Environment or folder, or onto different Environments and folders. The following options are available to copy and paste Containers:
-
Right-click the Container you wish to copy and press Copy in the menu. Then left-click the Environment or folder under which the new Container will be placed. Right-click again and select the Paste option in the menu.
-
Use CTRL+C and CTRL+V to copy and paste the Container.
-
Hold the CTRL button. Using the mouse, drag and drop the Container under the desired Environment or folder.
-
Press the Copy icon on the main toolbar, select the Environment or folder where the new Container will be pasted, and then press the Paste icon on the toolbar.
Moving Containers Between Folders and Environments
In the Container Manager you can drag Containers and drop them under another Environment or folder. Moving the Container will maintain all its original properties and all associated target databases.
Adding Databases to a Static Container
After a Static Container is created, you can add more database to the Container from the Container Manager by using the Add Databases Wizard. In addition, you can also add databases to the Static Container by right-clicking the Static Container icon and selecting the Wizard option to invoke the Static Container Wizard. A third option of adding databases that are already defined in existing Static Containers is by copy-pasting databases between Static Containers.
To start the Add Database Wizard follow these instructions: Right-click the Static Container icon and select Add → Add Databases. You can also invoke the wizard from the main menu by selecting Container → Add Databases.

Add Databases Wizard
The Add Databases Wizard is useful for adding one or more databases to an existing Static Container. Before starting the wizard, make sure that the servers that contain the databases you wish to add are registered as Combine Servers in the Object Browser. After you start the Add Databases Wizard, the first page after the welcome page will ask you how to select the database to be added. Two options are available as described in the figure below. To explain the Add Databases Wizard, both options will now be presented.
Adding databases from servers in the Object Browser. The Select Databases option allows you to add databases from either Combine Servers or Registered Servers in the Object Browser. To use this method, click the Select Databases option as shown in the figure below and press Next.
A new wizard window shown in the next figure will appear, and it allows you to choose the Container databases. In this example two databases named Web1Dev and Web2Dev on the servers DevSvr1 and DevSvr2 will be added to the Static Container.
Each database can only be defined in the Container once. If you are adding databases that already exist in the Container then you will be prompted with a warning message. After selecting the databases press the Next button to finalize the changes to the Static Container, and press Finish in the last wizard window.
Adding databases from other Static Containers. The second method of adding databases to the Static Container is by selecting databases that already belong to other Static Containers. In this example, assume that a Static Container named All User Databases was previously created and holds all user databases on the DevSvr1 and DevSvr2 SQL servers. The All User Databases will be used to add the desired databases. In order to copy databases from other Containers, select the option “Copy databases from another Static Container” as displayed in the following figure.
After hitting the Next button, the window presented below will let you select the databases from other Static Containers. In this example, the two Web databases are selected.
When done, press the Next button and then Finish in the last wizard window.
Copy-Pasting Databases Between Static Containers
The Container Manager allows you to copy databases from one Static Container and paste them under a different Static Container. This technique is useful to add databases that are already defined in one Static Container to another. If you paste the target database in the same Static Container you will be asked to either override or discard the paste action, since each database can only be defined once for each Container. To copy a target database, please use one of the options below:
-
Right-click the database you wish to copy and press Copy in the menu. Then left-click the Static Container under which the new database will be placed. Right-click again and select the Paste option in the menu.
-
Use CTRL+C and CTRL+V to copy and paste the Container. To use CTRL+V be sure to select the Static Container in which the new target database will be placed.
-
Hold the CTRL button. Using the mouse, drag one or more databases and drop them on the icon of the desired Static Container.
-
Press the Copy icon on the main toolbar, select the Static Container where the new Container will be pasted, and then press the Paste icon on the toolbar.
Moving Databases Between Static Containers
Combine allows you to move databases from one Static Container to another, under any Environment or Folder. First select the database to move. Then, drag and drop the database on the icon of the Static Container in which the database will reside. In the same manner you can drag and drop multiple databases.
Active Environment
In the Container Manager you can define multiple Environments, and place both Static and Dynamic Containers under each Environment. Moreover, Container names in different Environments can have the same name. When running scripts, queries, and code packages against Containers, Combine will run the scripts against Containers in the currently active Environment. Furthermore, only a single Environment can be active at any given time and the active Environment is the one with bold letters in the Container Manager. To demonstrate the functionality of the active Environment, consider the images below. When running scripts against the Container named All User Databases when the Development Environment is active, each script will be run against all databases in that Container. If you set the Production Environment to be active instead of Development, running the same script against the Container with the same name will execute the code on the databases defined in the All User Databases Container under the Production Environment.
As stated above, the active Environment is the one having bold letters in the Container Manager. For example, the Development Environment is the active Environment in the figure below.
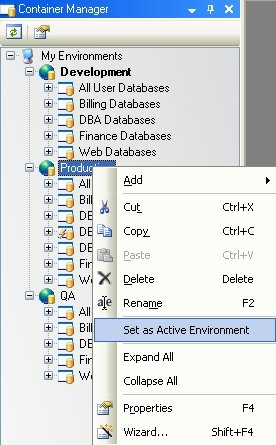
You can set other Environments to be active by right-clicking the desired Environment icon and selecting Set As Active Environment from the options menu. Doing so will “deactivate” the previously active environment and will set the new Environment as active.
Installing a Combine Repository to Share Environments and Containers
Combine enables users to share the settings of Environments and Containers by using a repository. This repository is referred to as a “Combine Repository” throughout this document (to distinguish it from other repositories that can be used in the application). To install the repository, please follow the instructions below:
1. Locate the SQL script that installs the repository. The SQL script is named “Create Combine Repository.sql” and it can be found at the download section on JNetDirect’ website and is also available under the Combine installation directory (for example, under the folder: C:\Program Files\JNetDirect\Combine\Repository\CombineRepository).
2. Create the repository database on a SQL Server: Locate the SQL Server that will hold the repository database. This SQL Server can reside anywhere on the network where it can be accessed by users, and it can be SQL Server 2000 or any later version. Log on to the server and to the Master database as an administrator (either as the sa user or as a domain administrator) and run the script “Create Combine Repository.sql”.
This SQL script creates a database called CombineRepository (see notes below), the schema (tables and stored procedures) for the database, as well as three SQL roles: RepositoryReaders, RepositoryChangeManager, and RepositoryAdmins. Users that belong to the RepositoryReaders user group will be able to read and use the Environments and Containers settings that are stored in the repository, however will not be able to make any changes to the settings or repository data. On the other hand, RepositoryChangeManagers and RepositoryAdmins can make changes (e.g., create or delete Environments and Containers).
3. Define users for the Combine Repository – make sure that all users that will be using the Combine repository have access to the repository database. At this point you can also set the permissions and access restriction to the repository users by adding them to the designated SQL roles described in the earlier paragraph. For example, some users can be granted access to the CombineRepository database and then be added to the RepositoryReaders group; other users can be added to the RepositoryAdmins group. For your convenience, a SQL script called “Examples – Adding users to Repository roles.sql” contains examples of how to add users to the different SQL roles and is available on JNetDirect’ website as well as under the Combine installation directory (e.g., C:\Program Files\JNetDirect\Combine\Repository\CombineRepository).
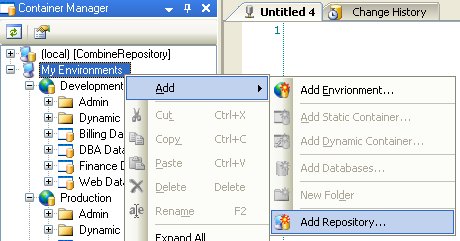
4. Instruct users to add the Combine Repository to their Combine client application. To do so, each user will open the Container Manager, right-click the MyEnvironments node, select the Add → Add Repository menu option (see image) and start the Wizard. In the Wizard, each user will be required to specify the database and SQL Server that holds the repository, as well as provide the authentication type and login to connect to the database. Then, Combine checks that each user indeed has permissions to access the repository and then adds the repository to the Container Manager on the client user-interface.
Notes:
a) Name of the repository database – By default, the name of the repository database is CombineRepository. However, you can open the SQL script and change the repository name to use any other database name as you so desire.
b) Comments on security – Combine is designed to be secure: Credentials, passwords, authentication type, and any other permissions or security information that relates to Containers and Environments is not stored in the repository. Each user will have to define his or her own access permissions to the Environments and Containers in their user-interface. Once provided, those settings are stored securely on the client machine, and are not stored in the repository.
c) Installing multiple repositories – By following the steps 1-4 above you can install as many repositories as you wish, so that different groups of users in your organization can see different Environments and Containers. For example, some organizations only allow production DBAs to view the Environments and Containers settings in Production, while allowing developers and test-engineers to view all settings in Development and Quality Assurance (QA). To accommodate this scenario, one repository can be used by developers and test engineers and a second repository will be installed by DBAs in Production, which will also have access to the first repository. Developers and test-engineers will add the repository containing the Dev and QA settings to their Combine user-interface, while production DBAs will add the two repositories to see all Environments and Containers across Dev, QA and Production.
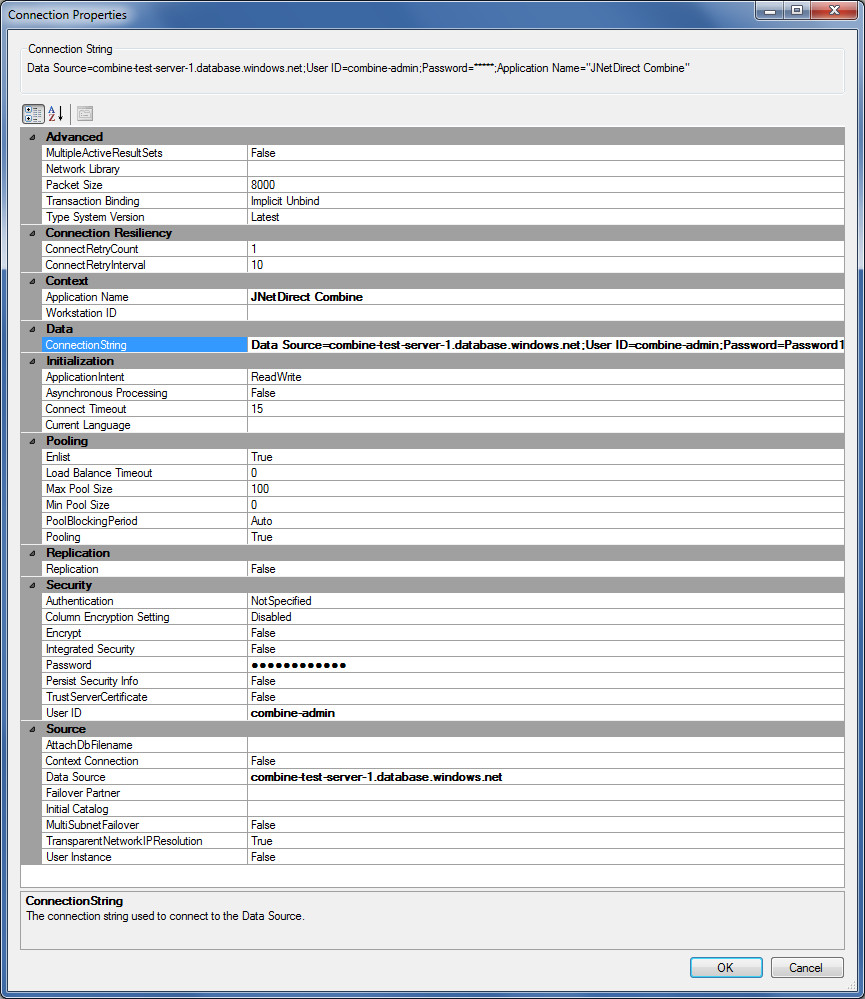
Connection Properties
Connection Propeties dialog allows to modify all properties available for Microsoft SQL Servers.
User has two options to modify parameters. First, you can change corresponding parameters in the list. The second way — you can edit the entire connection string directly which is located in “Data” section. All changes made to the connection properties are reflected in a “Connection String” at the top of the window.
Below is a list of the most commonly used properties:
-
Section “Security”:
-
Integrated Security — Indicates whether the connection is to be a secure connection or not. When integrated security is set to “True”, SQL Server leverages Windows NT authentication to validate SQL Server logon accounts. Otherwise SQL Authentication is used.
-
User ID — User login name which is used for SQL Authentication
-
Password — User password which is used for SQL Authentication
-
Encrypt — Turns ON SSL encryption for SQL Server DB Instances. Please see Encryption for more details.
-
TrustServerCertificate — When the Encrypt property is set to True and the TrustServerCertificate property is set to True, Combine will not validate the SQL Server SSL certificate. This is usually required for allowing connections in test environments, such as where the SQL Server instance has only a self signed certificate.
Please note that Combine version 6.2 and below always turn ON this property. But for security reasons Combine 6.3 (and above) does not enable this property by default. So if you have self signed certificates you have to manually switch TrustServerCertificate property to True.
To setup SSL certificates on Amazon please refer to the Amazon documentation
-
Column Encryption Setting — Enables Always Encrypted feature. To use this feature please make sure that .NET Framework version 4.6 or higher is installed on your development machine. For details, please see .NET Framework 4.6 documentation. Please note that, enabling Always Encrypted is not sufficient for encryption or decryption to succeed. You also need to make sure:
-
The application has the VIEW ANY COLUMN MASTER KEY DEFINITION and VIEW ANY COLUMN ENCRYPTION KEY DEFINITION database permissions, required to access the metadata about Always Encrypted keys in the database. For details, see Permissions section in Always Encrypted.
-
The application can access the column master key that protects the column encryption keys, encrypting the queried database columns. The simplest way to achieve it is to put corresponding master key certificates into a Windows Personal Certificate Store with certmgs.msc utility.
-
-
Section “Pooling”:
- Pooling — Enables connection pooling.
Combine version 6.2 and below does not use pooling. Combine since version 6.3 lefts this property in it’s default state — True. So if you no need pooling you should manually turn this option OFF.
To see detailed explanation of other properties please refer Microsoft SQL Server documentation.
Note. List of Connection Properties contains all available parameters for SQL Server. All of the parameters have default values which are used when the parameter is not specified in a connection string. When parameter is set to such default value it is listed using ordinary font, so user is able to see which value will be used. When user changes any value — this value is displayed in bold to reflect the fact that it is not a defult. Also this parameter is added to the resulting ConnectionString which will be send to SQL Server.
To restore default value for a parameter user may directly edit the entire connection string in “Data” section and remove the parameter form the string.
Backward compatibility for Connection Properties
Combine 6.3 introduces a new functionality — Connection Propeties dialog. Below table lists correspondence between the previous connection settings and the new ones.
-
Authentication Type – Security / Integrated Security. If it is set to TRUE when Windows Authentication is used, otherwise SQL Authentication.
-
Use Encryption – Security / Encrypt.
-
Login Name – Security / User ID.
-
Password – Security / Password.