Getting Started
Hardware and Operating Systems
JNetDirect Combine 6.3 can be installed on x86 and x64 processors running the following operation systems:
-
Windows XP SP3
-
Windows XP x64 Edition SP2
-
Windows Vista
-
Windows 7
-
Windows 8.0 & 8.1
-
Windows 10
-
Windows Server 2003 SP1
-
Windows Server 2008 & 2008 R2
-
Windows Server 2012 & 2012 R2
Combine 6.5 Installation
Combine installers may be downloaded from the JNetDirect website. There are two installer versions on the site — for both x86 & x64 computers. They are fully functional versions, but without a license Combine works in an evaluation mode.
To install Combine please do the next steps:
1. Run the appropriate Combine installer — x86 or x64.
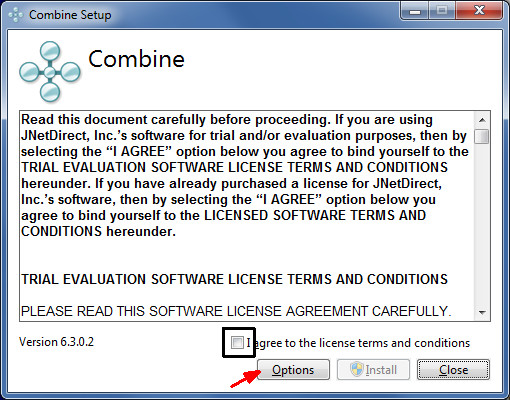
2. Please read the Agreement. You have to accept it by selecting “I agree to the license terms and conditions” check box to continue the installation.
3. You may change some installation options by choosing the Options button.

At this point user is able to select installation location, choose the shortcuts to create and configure the used MS SQL Server library in “SQL Server compatibility level”. This compatibility level defines the version of the MS SQL driver used by Combine. Newer drivers are mostly compatible with older MS SQL Servers so Combine by default uses the latest driver.
The only feature which may be incompatible is the Registered servers created by MS SQL Server Management Studio. If you are using Registered servers in Combine please select the corresponding SQL Server version in “SQL Server compatibility level” field. Another option is to move all required SQL servers from the “Registered Servers” group to the “Combine servers” group before Combine upgrade.
Please note that “SQL Server compatibility level” option selects an MS SQLServer driver version to install, and this choice can not be altered after Combine installation. To change the installed library you will have to re-install Combine.
4. Install Combine.
5. Deploy your license file to a Combine application folder (by default — C:\Program Files\JNetDirect\Combine).
6. Run Combine application, it asks “Activation Required”.
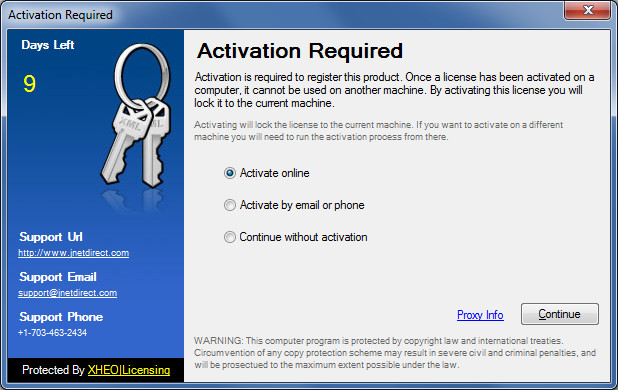
7. Please use “Activate on-line”. It requires a direct Internet access for Combine to talk to our activation server. If on-line activation is success — Combine is ready to work, skip the next steps.
8. If on-line activation is not possible please choose “Activate by email or phone” option and then click “Continue” button.
9. A new page appears, please copy the “Serial Number” and “Machine Key” field values and email them to us (support@jnetdirect.com).
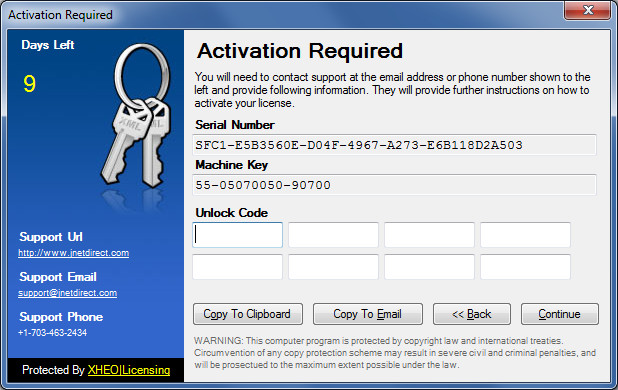
10. Our support team will generate “Unlock Code” and send it back to you. You will have to enter it in the activation page and click “Continue” button.
Note: If you have a problem with applying unlock code – try running Combine as Administrator.